| | The samurai build |  |
|
|
|
| Author | Message |
|---|
PuddleJumper

 Number of posts : 44 Number of posts : 44
Age : 36
Location : Pasadena
Registration date : 2010-03-07
|  Subject: The samurai build Mon May 03, 2010 9:40 am Subject: The samurai build Mon May 03, 2010 9:40 am | |
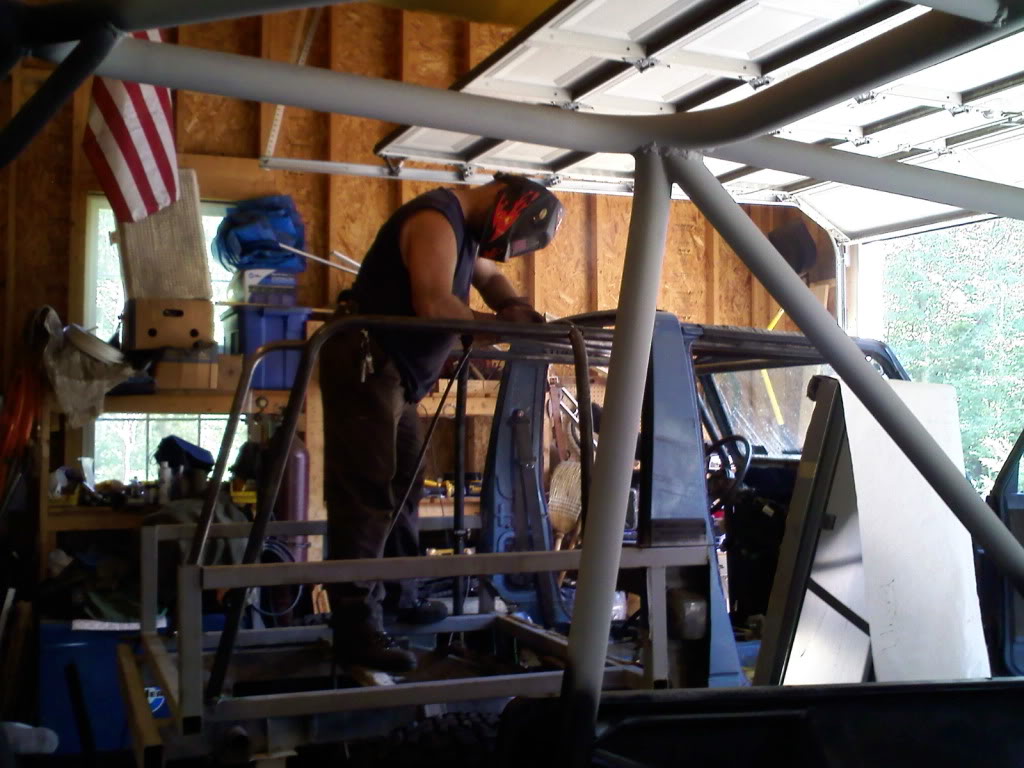
| So I figured I would post up a little of what I have done so far. copy and pasted from the first thread. Well, I figured I would Put up my plans for the sami since everyone else is putting their builds up. I plan to stretch the frame/body about 12in and move the front axle forward 6in. This should give me about a 97-100in wheel base. Plans right now (Subject to change) - Engine swap: 22R Toyota 97hp & 129ft-lbf (sami engine 63hp and no torque) - 4.10 Toyota Axles front and rear w/ at least a rear spool. (sami 3.73) - 2wd Toyota Transmission 3.95 1st gear (sami 3.652) - Sami 6.5:1 T-case - (between axles, trans and t-case this should give me a final drive ratio of about 105:1. Right now i have 88.5:1) - Power steering (looking to do a Cherokee power steering box due to its inside the frame Now doing a Honda Passport/ Isuzu Rodeo Box, inside the frame rear facing in front of the front clip. Most do yota IFS but you have to worry about clearance on the leaf spring due to its outside frame mounted.) - External reservoir (still up in the air since I am not sure which pump I am using)Purchased Power steering pump, reservoir, and pulley assembly off the same year engine. - YJ leaf springs front and rear with 5-6in shackles. (should give me another 2-3in of lift and MUCH more flex) - New shocks with Axle mounted shock tabs - Raised shock buckets (possibly ford ranger buckets) - Replacement gas tank for current leaky one.Purchased replacement gas tank. contemplating fuel cell - New seats (Given to me by Rob. Much appreciated! Lets just say with the old ones if you didn’t have a back problem.. you do now!) - 35-36in tires. - Rock sliders - Rear bumper With the extension of the body this will allow me to cut the rust out of the rear... which just so happens to be the whole rear end behind the seats. I plan on upgrading the sheet metal and remaking the bed like the old LJ80. (basically the inside fenders will be boxed to the top of the side wall and run most of the rear bed, this makes for a very large wheel well) the outside panels will be upgraded in thickness and will boast TJ rear fenders, and all of this will be tied together with square tube for strength. Here are the different lwb builds I have read and studied. http://www.greatlakes4x4.com/showthread.php?t=96821http://www.zukikrawlers.com/showthre...?t=6522&page=2http://bbs.zuwharrie.com/content/topic,36488.0.htmlhttp://www.pirate4x4.com/forum/showt...hlight=22r+2wdOh yea... and a cage will come sometime... Some things have changed since my first post -For power steering I will be using a box off of a early 90's honda passport/isuzu rodeo. -Tires will be brand new 37" MTR's (got the last 5 brand new 37 mtr's from goodyear in the US ) -Going to a fuel cell under the rear of the tub -Fully rebuilding yota axles Spartan Locker front Spool Rear -Decided on a Slutty Snatch from ZOR. - "Home made" missing links which consist of greasable extended xj shackles from Rusty's off road and the tops are made from 1/4in steel plate, going to box the top of them in for strength as well as a better perch for the bumpstop to rest parrallel to the frame. Most everything I have fabbed myself and with the help of a buddy. Currently in the process of putting the suspension under her and getting a rolling chassis. still need to cut the rest of the brackets off the frame and extend the rear for a bumper and a little extra length on the body. I know theres more but I figured id give your eyes a rest. Build is a tad slow since im the only one working on it and this is my first real build. I also keep/work on it out in middletown md which is about an hr or so away from where I live. Please feel free to comment, and make suggestions. 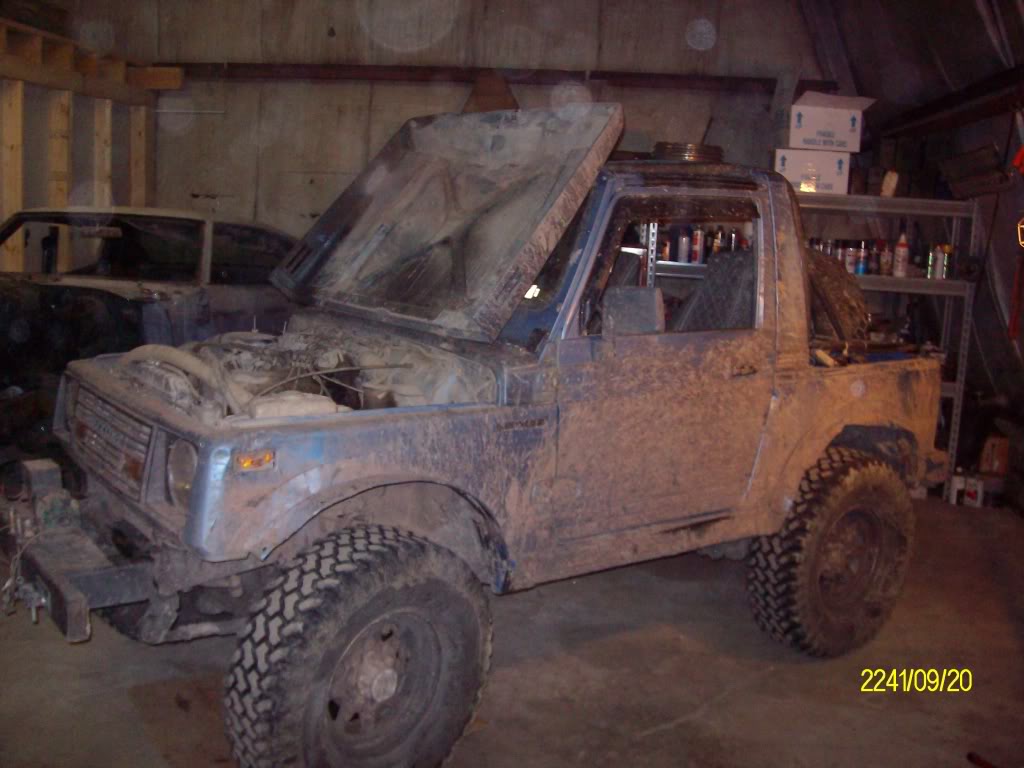   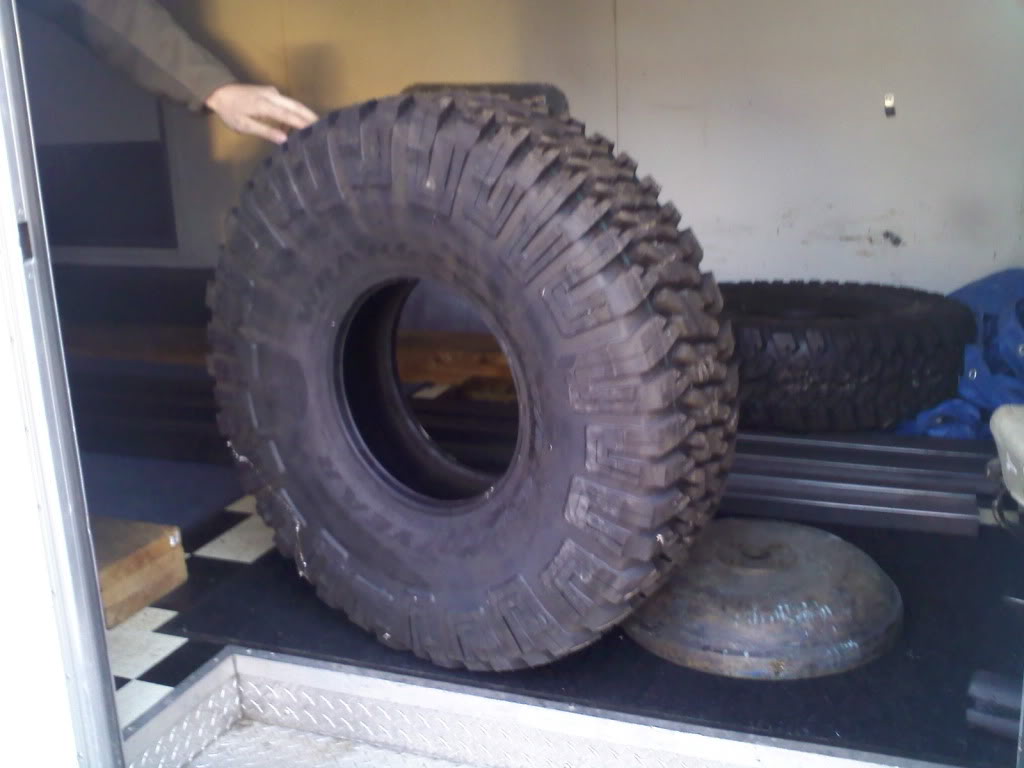   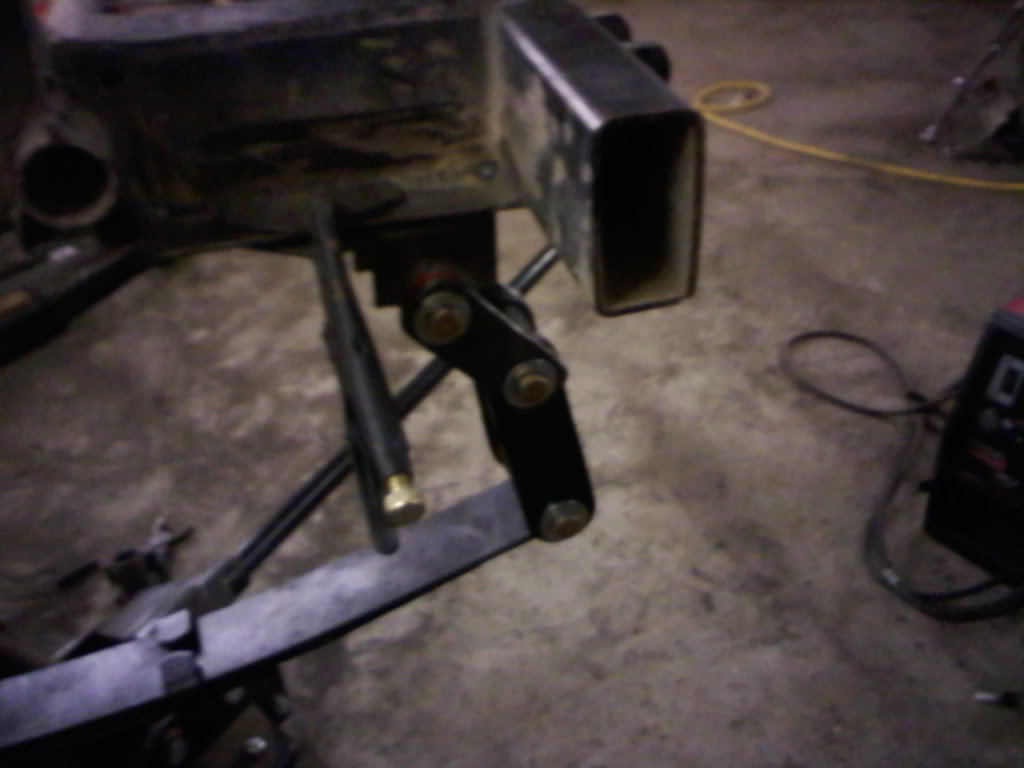 Plan for the way the rear tub will look.   and this is what I did over the weekend. In the scheme of things I didnt get a whole lot accomplished but got to the point where I can actually see some sort of progress. Welded up a rear bumper. real simple design just like the front. made 6in extensions then added the tube for the bumper. I havent fishplated anything on the frame yet because I would like to see where drivetrain and other sort of mounts are going to need to go. With the rear bumper on, it pushed me to the next phase of the build, the body. So I put the body on with the two front mounts as guides. I am going to need to have to make all new body mounts on the frame/body with the exception of the two on the front and on the front clip. the next part of the build will be cutting her up. I will be making two different cuts. the very rear of the tub where it starts to wrap around and has the tailgate (also two body mounting points) and another cut directly behind the door. so basically I am just making the "bed" of the tub. from there I will frame out the bed with the 2x2 box I have. from there I will be able to see where all the body mounts will go and I can weld them up. then I will move to fitting the engine and trans and sami case. pull the body back off and...your getting the picture.  And just to give you an idea of the wheel base stretch this is when I was unhooking stuff for the 1.3l 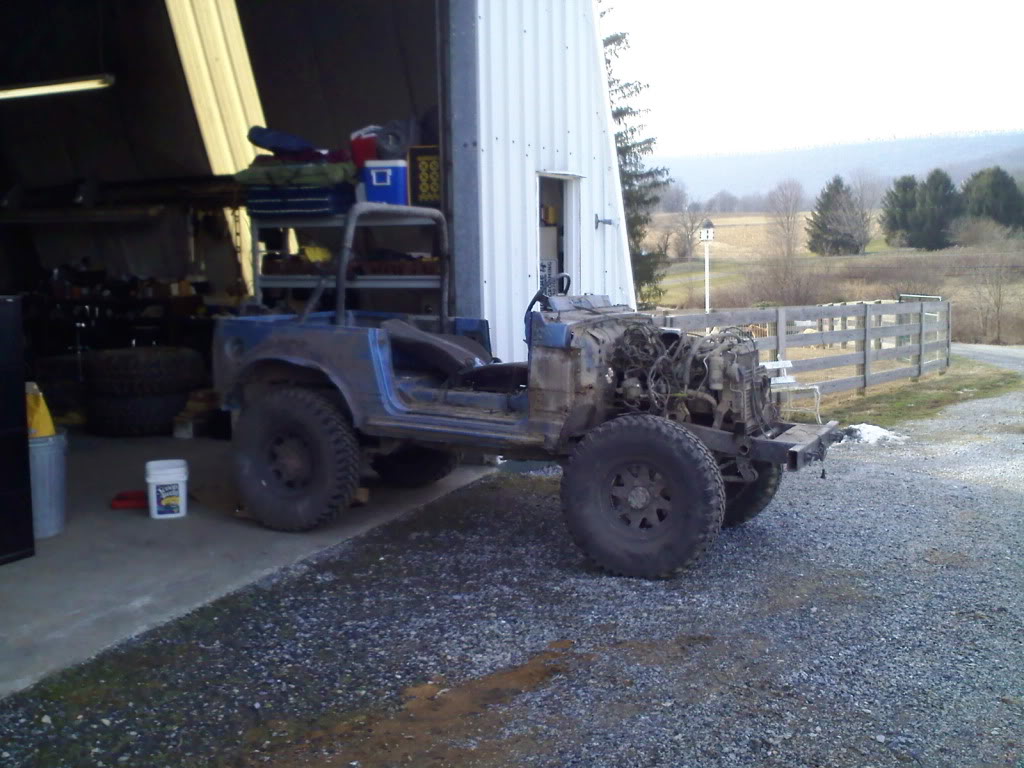 And here is as of yesterday 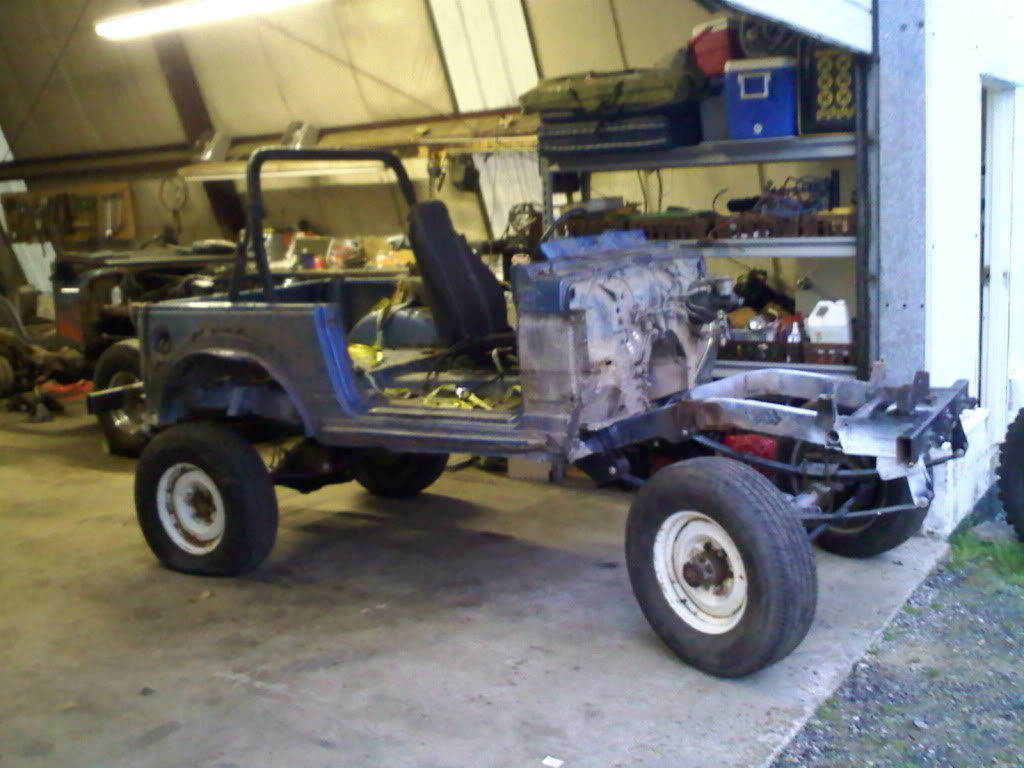 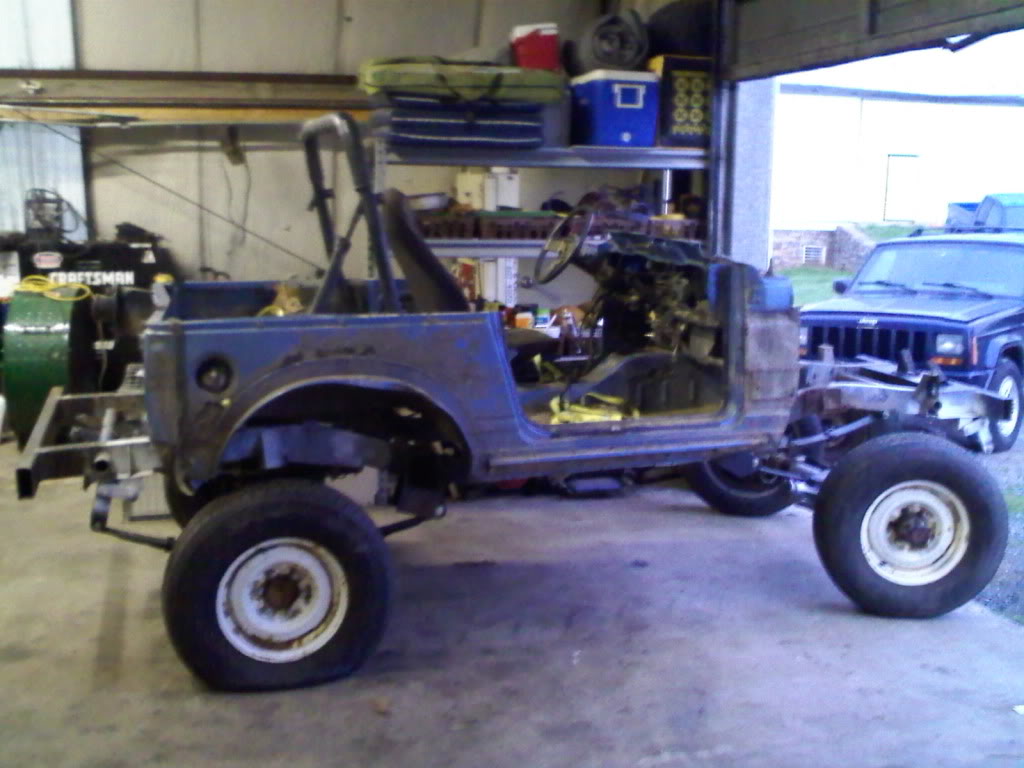 | |
|
| | |
CamoK5
Forum Trail Guide


Number of posts : 284
Location : Havre de Grace
Registration date : 2009-02-03
| | Subject: Re: The samurai build Mon May 03, 2010 8:03 pm | |
| Sweet can't wait to see it finished. Nice job.  | |
|
| | |
crazyjimmy
Forum Trail Guide

Number of posts : 318
Age : 62
Location : Murray Kentucky
Registration date : 2009-02-03
| | Subject: Re: The samurai build Wed May 05, 2010 3:05 pm | |
| nice, "build it and it will wheel"
wish I had the time | |
|
| | |
PuddleJumper
Number of posts : 44
Age : 36
Location : Pasadena
Registration date : 2010-03-07
| | Subject: Re: The samurai build Sun May 09, 2010 11:56 pm | |
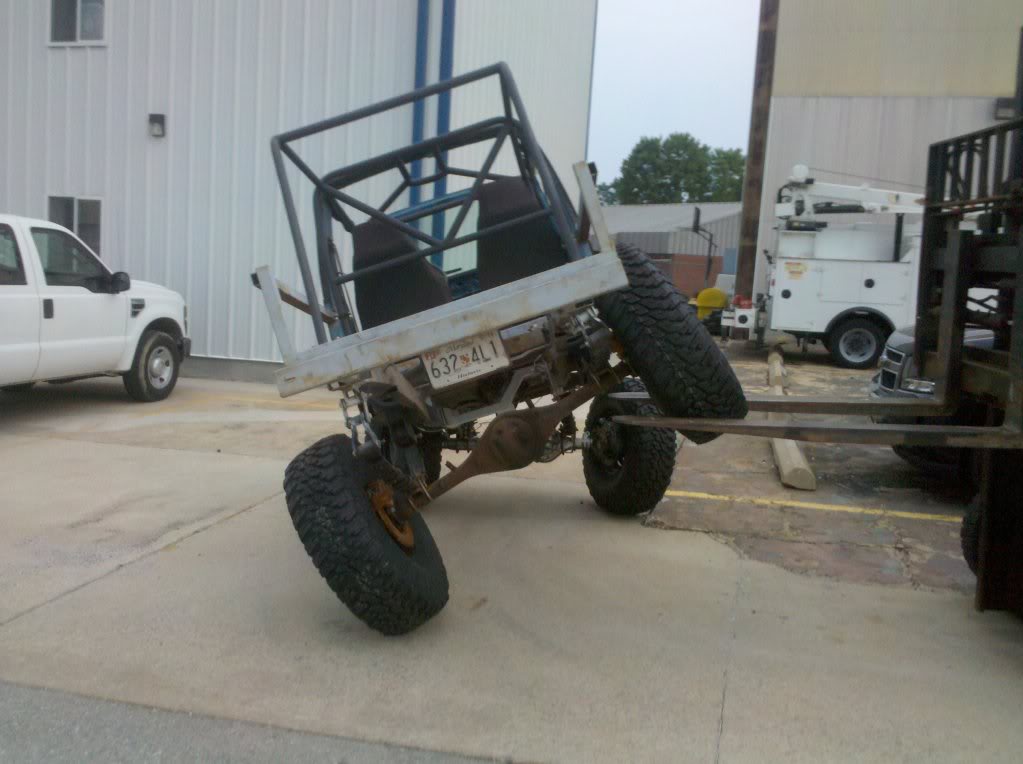
| PuddleJumper;519211]Well I got just about everything I wanted to accomplish this weekend just about done so i'm pretty happy right now. I cut the rear of the tub off. Then I put the 37's on for the initial test fit and also so I could figure out where I wanted to put the rear of the tub frame rails. My original plan was to use the very back of the tub, where it starts to round off on the back and that holds the tailgate. well after I cut it off seperate from the tub I found that it was basically unsalvageable. rust was everywhere. it basically consisted of two stamped pieces welded at the seams. and both pieces rusted in many different places. So after a good half hr of trying to recover it, I scraped it and decided to just build the whole rear from scratch. I still wanted to use the tailgate so I adjusted some measurements and voila, I had space for a tailgate. it also worked out because it made the rear of the frame not as wide as the center. this allowed me to make it so it will have a little bit of transition and not just a 90degree for the rear of the tub. Let me just say, welding sheet metal SUCKS! espeacially half rusty old tub metal. I got what I could out of rust. plan is to smooth it down so the floor will go over it smoothely. when making the rear of the frame I put the doors back on to make sure everything stayed strait I measured the front bumper height, rear bumper height, and floor height and sent them in a txt to david and rob, I cant find it so maybe they will put them up. I do remember the bottom of the floor was exactly 3ft from the ground. obviously the numbers will change with weight but it should be around there with the mounts and everything. the thing is BIG! on to the pics. 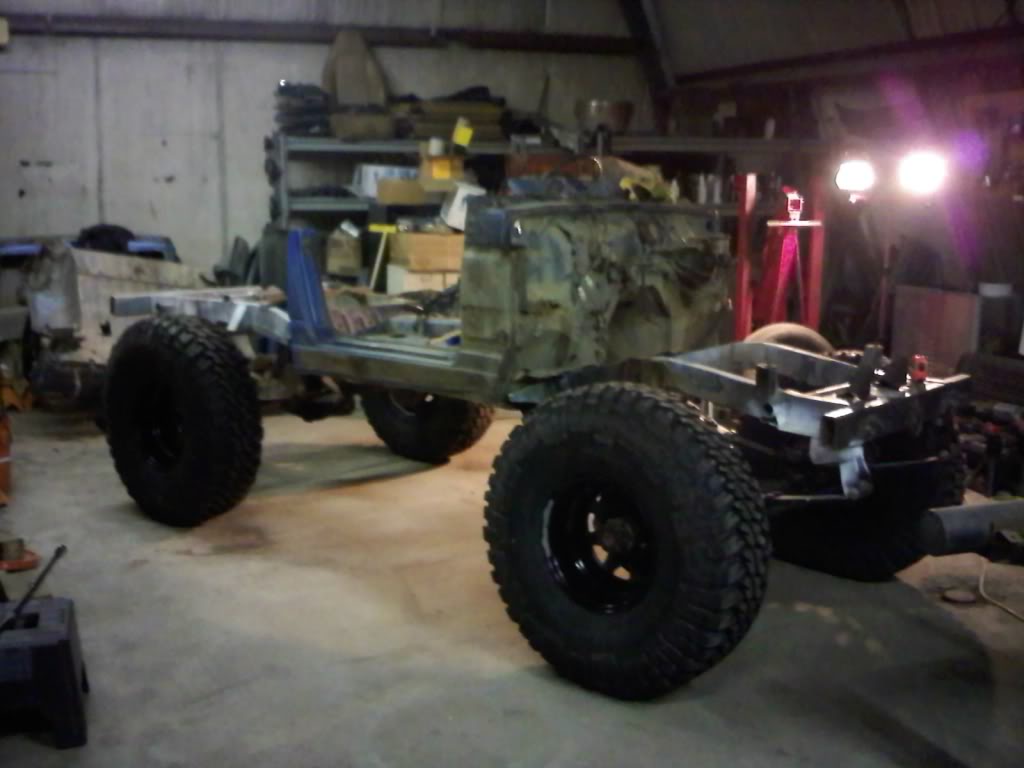 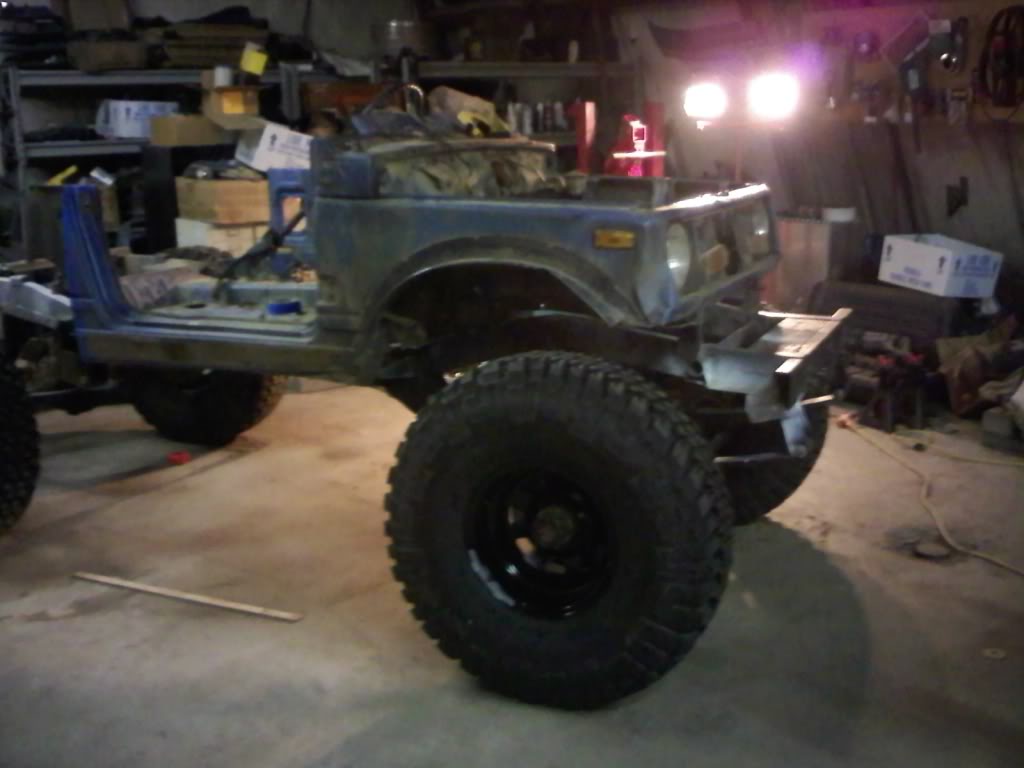 [/QUOTE]   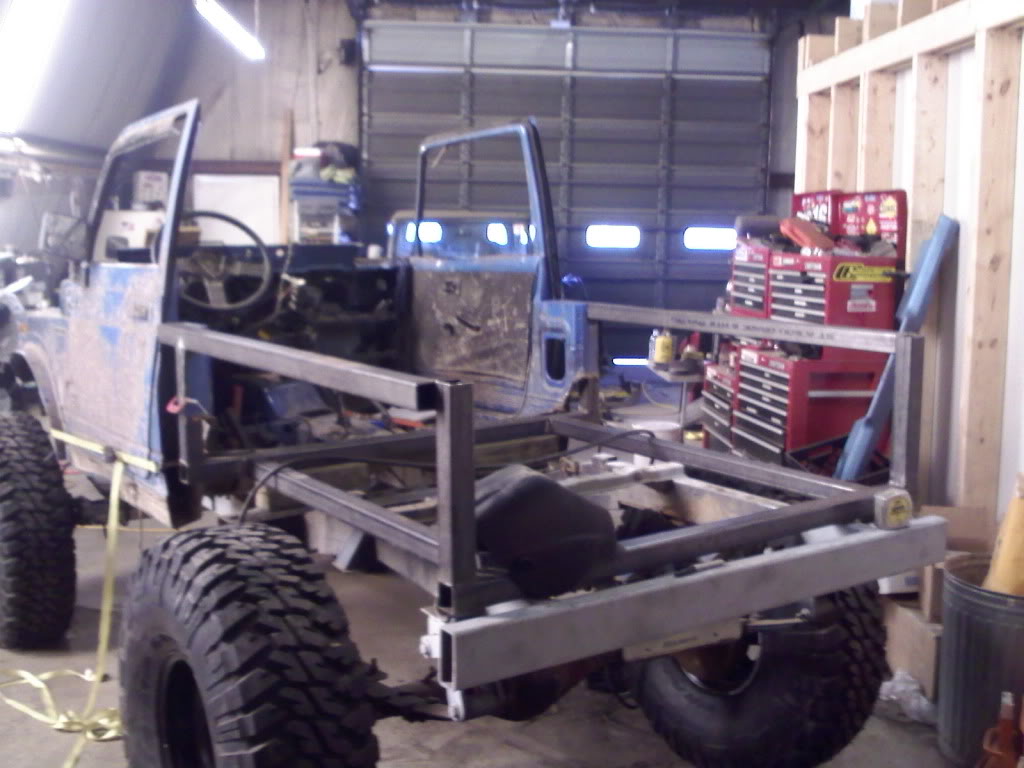 I just set it on there, no its not crooked  Fairly happy with the look so far. 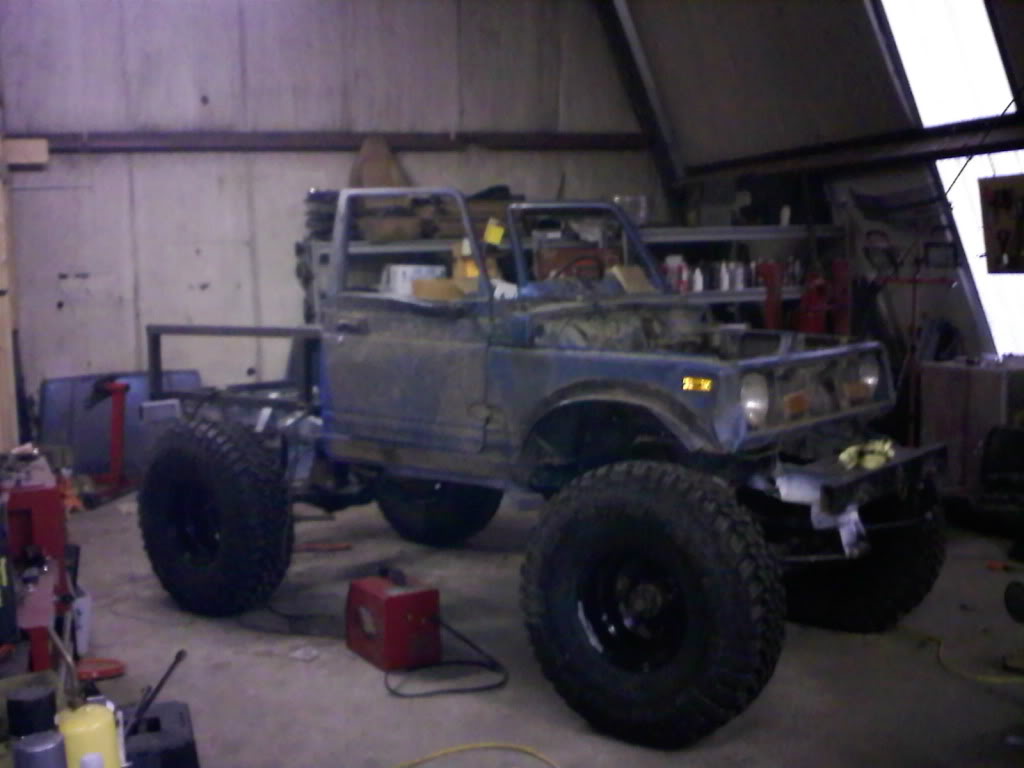 | |
|
| | |
mdcj7
Forum Trail Guide

Number of posts : 481
Age : 70
Location : Parkville Maryland
Registration date : 2009-02-03
| | Subject: Re: The samurai build Mon May 10, 2010 8:21 pm | |
| looking good can't wait to see it out on the trail | |
|
| | |
PuddleJumper
Number of posts : 44
Age : 36
Location : Pasadena
Registration date : 2010-03-07
| | Subject: Re: The samurai build Tue May 11, 2010 8:41 am | |
| - mdcj7 wrote:
- looking good can't wait to see it out on the trail
Thanks! Im pretty excited. Before it was yea ill get to the project when I can. Now I feel I really need to get my arse in gear and get it done! Im shooting for the goal to be done and fire it up before july 4th weekend. Maybe even do a test run at rausch that weekend. The measurements are as follows. I am guessing they will lower about 2 inchs with final product. 30.5" to the front bumper 32.5" to the rear bumper 27" To frame (center) | |
|
| | |
PuddleJumper
Number of posts : 44
Age : 36
Location : Pasadena
Registration date : 2010-03-07
| | Subject: Re: The samurai build Mon May 24, 2010 9:15 am | |
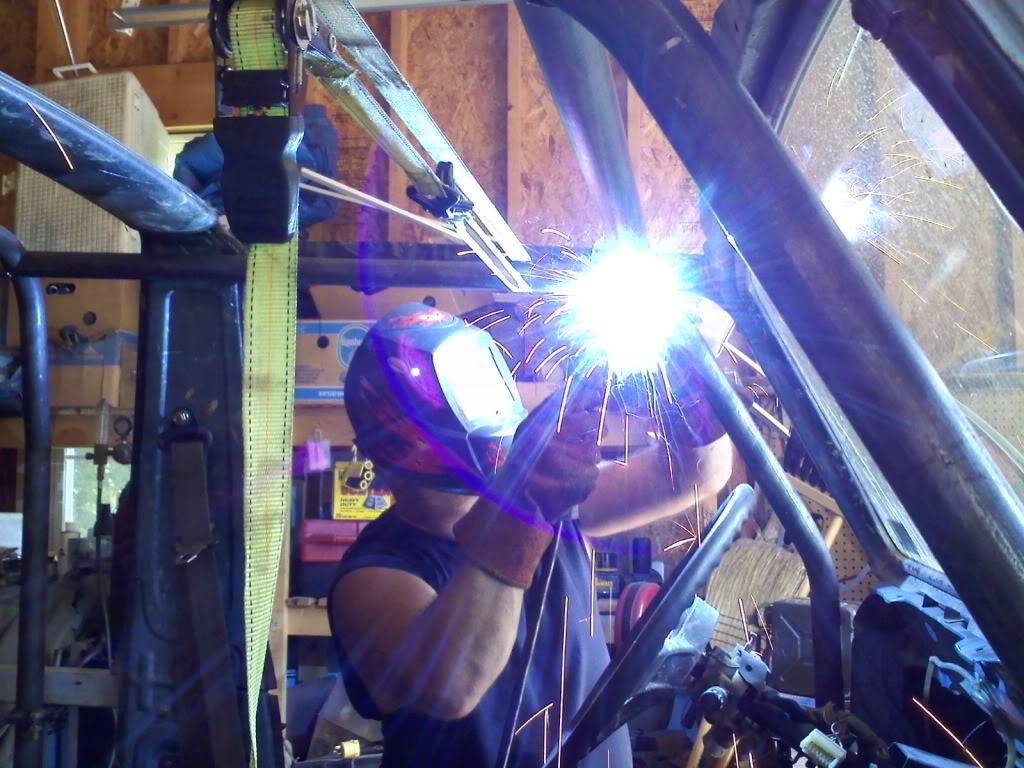
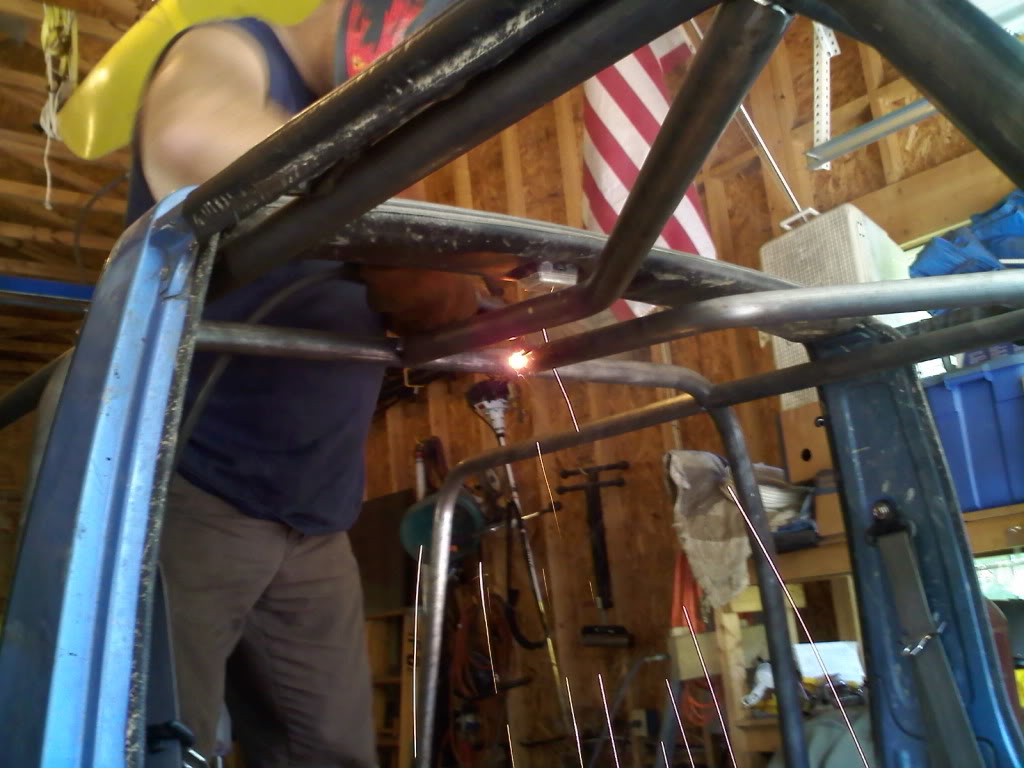
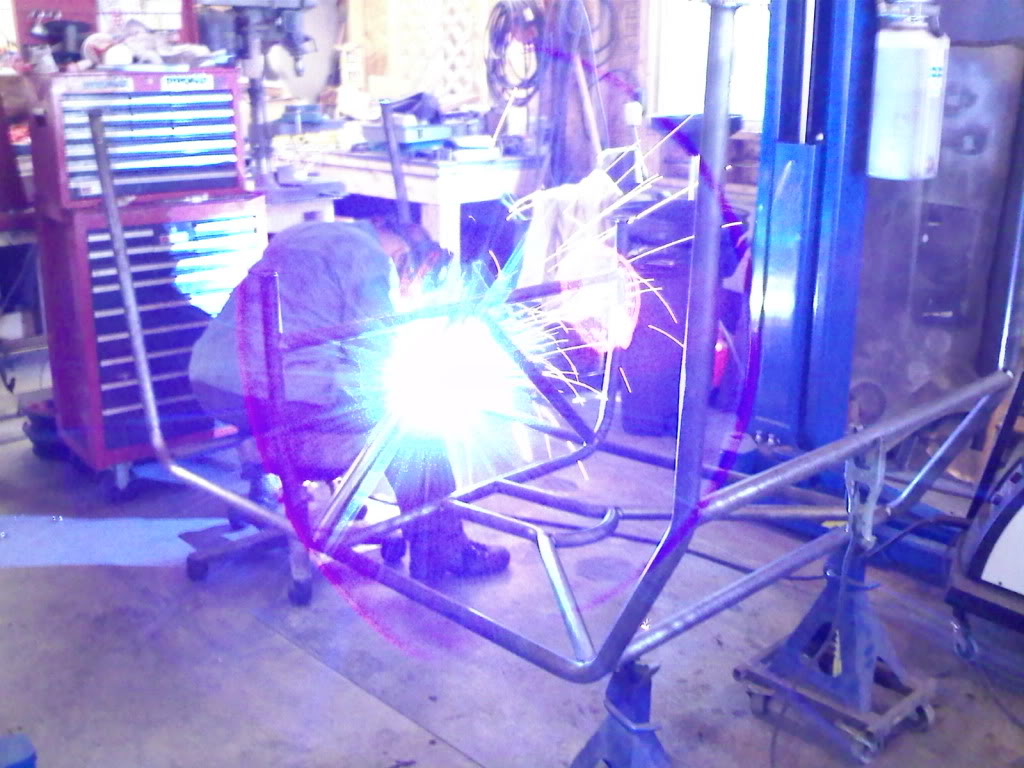
| This weekend I had a little help from a friend of mine putting the engine and trans in. the 22r and yota trans deffinitly took some persuading to put in, especially the trany tunnel. but a couple quick zips with the body saw and a BFH it was like they were made for each other. Had to fab up some engine mounts so I decided to take an idea from one of the guys off of pirate that put a 22r in his sami. instead of stock engine mounts that always break, I wanted to using a strait bolt through design such as what your leaf springs use. I welded the front spring perch(new) of a cj5 to the angled mount the bolts directly to the engine. with this I had to fab up a frame mount. this was done by taking a piece of 4x2 angle it at a 45* angle and cut to length. plasma cut part of the side off or it to get the shackle/engine mount in. cut a couple pieces of 1/4in flat to put in the box tube as spacers and burned them in. I still have to fab up a trany Xmember. while I was welding up the frame mounts, david put the body back together. we did this because next weekend the measuring for the roll cage will comense. taking the sami to a guy in our local club who has the bendtech program. Pics will come soon. | |
|
| | |
PuddleJumper
Number of posts : 44
Age : 36
Location : Pasadena
Registration date : 2010-03-07
| |
| | |
mdcj7
Forum Trail Guide
Number of posts : 481
Age : 70
Location : Parkville Maryland
Registration date : 2009-02-03
| | Subject: Re: The samurai build Wed May 26, 2010 6:45 pm | |
| are you puting longfields in the axle when you rebuild it? | |
|
| | |
PuddleJumper
Number of posts : 44
Age : 36
Location : Pasadena
Registration date : 2010-03-07
| | Subject: Re: The samurai build Thu May 27, 2010 8:48 am | |
| Dont have the coin right now. but im sure with 37's they will come soon enough. theres a couple of things I would like to step up to on the axle's including longfields/chromoly, 5.29 diff gears and possibly selectable lockers. so for now this rebuild/build up is just to clean that 25yr axle and do a little upgrade with lockers. as of right now my gearing puts me at a crawl ratio of 105:1. with the 5.29's It will step me up to about 135:1. High range ive already been helped since the sami case is a 1.7:1 and the stock yota case was a 1:1. theres definitly more things I could step up to and change on this rig,I guess you can say this is my 3rd stage of the rig and I can go up to the 5th stage over time.. | |
|
| | |
mdcj7
Forum Trail Guide
Number of posts : 481
Age : 70
Location : Parkville Maryland
Registration date : 2009-02-03
| | Subject: Re: The samurai build Thu May 27, 2010 6:10 pm | |
| for the rebuild of the front axle these are the best alxe seal going axle sealwhlie you have it strip down you should put this kit on it to keep the balls from bending 37" tire are big for this axle gusset kithere is a link to my build when I put the Toyota axle in my jeep axle swap | |
|
| | |
PuddleJumper
Number of posts : 44
Age : 36
Location : Pasadena
Registration date : 2010-03-07
| | Subject: Re: The samurai build Fri May 28, 2010 10:16 am | |
| - mdcj7 wrote:
- for the rebuild of the front axle these are the best alxe seal going
axle seal
whlie you have it strip down you should put this kit on it to keep the balls from bending 37" tire are big for this axle
gusset kit
here is a link to my build when I put the Toyota axle in my jeep
axle swap Very nice build up! I really would like to go chromoly just not in the budget right now. as for the kit for the birfs, I was planning on just cutting up some gussets out of 1/4in plate to weld in. same goes for tabs for the shocks. Not sure where I was the shocks yet so that will come later. what year axles did you use, 81-84? I have the 85 with the full width truss. did you truss any more of the axle? Ive seen those bearings before, but I went with bearings and a rebuild kit from PORC. If anyone plans to purchase lockers I would suggest going to them. Great bunch of guys and more then likely they will give you even a better price just for calling and ordering over the phone. they were the cheapest I found for most all of the lunchbox lockers I was looking at. oh and free ground shipping. I was also looking at the ford shock towers as well. But I think I want/need a little more travel then the stock towers so I might get the guy to bend up some hoops this weekend. will have to do some inside fender trimming.  | |
|
| | |
mdcj7
Forum Trail Guide
Number of posts : 481
Age : 70
Location : Parkville Maryland
Registration date : 2009-02-03
| | Subject: Re: The samurai build Fri May 28, 2010 4:55 pm | |
| Mine are out of a 81 or 82 it was truss 3/4 which worked out perfect for the spring under the full truss would of interfear with the spring perch. I was going to do a top truss but we read if you welded it to fast you could warp the housing did not want to take the chance. | |
|
| | |
PuddleJumper
Number of posts : 44
Age : 36
Location : Pasadena
Registration date : 2010-03-07
| | Subject: Re: The samurai build Mon May 31, 2010 8:22 pm | |
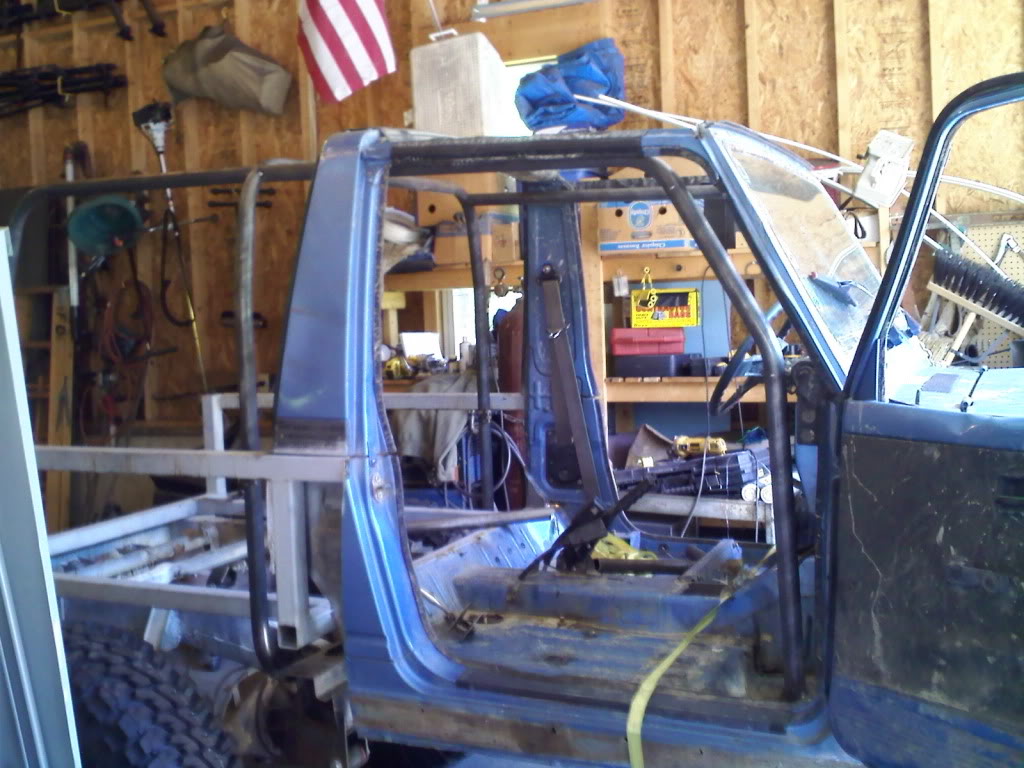
| Yea, the housing's are very sensitive to heat. I am putting diff covers on so I am having one of the fabricators in HRC weld it on for me when the cage goes in.
Actually worked on the sami over the weekend. We got the front axle fully rebuilt with the spartan locker in, new bearings, seals, calipers, brakes, etc. cut the brake shield down to help eliminate the build up of mud between them and the rotors. started on the rear, but when we started digging into it, we came across a couple of problems. the first was that I thought I had all the parts we needed. this turned out to be incorrect. When I was getting all of the parts from PORC I asked the guy to hook me up with everything I needed for the front and back. My mistake was I trusted he would, and I didnt look for myself. Lesson learned. So those will be placed on order as well as a couple other things that need to be replaced such as the ring gear bolts. the second problem was that the rear drums/shoes/ everything brake related was shot in the rear! So with some easy persuasion I was talked into doing the disc brake swap instead of drums. So I will have to do some research and see what it will take to do this. This was the first time the guy who owns the garage where we were working saw the sami. He made a joke to say "you know those 37's would look mighty nice on my jeep". Come to find out he has the exact same tires brand new as well except they are 35's. The toyota axle in a stock form is really only good up until a 35" tire. It just so happened I got the 37's for a steal, So long story short, we are trading. He is going to get a little bit bigger tire and I am going to get a little more reliabilty. (I mean come on a 35 on a sami is still huge lol) Work will comense back on the sami in 2 weeks. | |
|
| | |
mdcj7
Forum Trail Guide
Number of posts : 481
Age : 70
Location : Parkville Maryland
Registration date : 2009-02-03
| | Subject: Re: The samurai build Tue Jun 01, 2010 5:40 pm | |
| | |
|
| | |
PuddleJumper
Number of posts : 44
Age : 36
Location : Pasadena
Registration date : 2010-03-07
| | Subject: Re: The samurai build Tue Jun 01, 2010 7:04 pm | |
| - mdcj7 wrote:
- here is a link to brackets for the Tacoma calipers. I have everything but the brackets for mine but not sure if I want to give up my E-brake. What are your plans for the E-brake
http://www.ruffstuffspecialties.com/catalog/toyota-bracket-tacoma-calipers-p-413.html Did a little research last night and found the cheapest place around to be Davez offroad. $15 a piece. but im not completely sure if it is the toyota caliper or the chevy caliper. Id like to stay all toyota and older model toyota. that way spare parts would be easier. as for an E brake for now im thinking just using a line lock. possibly one for front one for rear. and just plumb it right to the dash right after the MC. | |
|
| | |
PuddleJumper
Number of posts : 44
Age : 36
Location : Pasadena
Registration date : 2010-03-07
| | Subject: Re: The samurai build Mon Jun 14, 2010 3:49 pm | |
| | |
|
| | |
crazyjimmy
Forum Trail Guide
Number of posts : 318
Age : 62
Location : Murray Kentucky
Registration date : 2009-02-03
| | Subject: Re: The samurai build Mon Jun 14, 2010 9:12 pm | |
| Nice. You are doing what I wish I could have the time to do.
Dont kid your self, those are GREAT pictures. | |
|
| | |
PuddleJumper
Number of posts : 44
Age : 36
Location : Pasadena
Registration date : 2010-03-07
| | Subject: Re: The samurai build Mon Jun 21, 2010 8:35 am | |
| got the rear axle finished up with the spool and disc brakes. Neat little kit. Had to make a "tool" to pull a backing plate off the axle, that took some time. But other then that it is a fairly simple kit. I chose the one that uses the same as the front rotors and calipers so I have a matching set. some of the other kits required machined rotors and different year calipers as well as a 2lb residual valve. Dont have any pictures for you since my camera on my phone broke friday..  | |
|
| | |
mdcj7
Forum Trail Guide
Number of posts : 481
Age : 70
Location : Parkville Maryland
Registration date : 2009-02-03
| | Subject: Re: The samurai build Mon Jun 21, 2010 8:10 pm | |
| can you give me the link to the kit you used | |
|
| | |
PuddleJumper
Number of posts : 44
Age : 36
Location : Pasadena
Registration date : 2010-03-07
| | Subject: Re: The samurai build Tue Jun 22, 2010 8:46 am | |
| - mdcj7 wrote:
- can you give me the link to the kit you used
http://www.lowrangeoffroad.com/index.php/yotamain/4runner/brakes/toyota-disk-brake-economy-kit.htmlThis kit is made by Trail Tough. I bought mine from Sean at LowRange who is a reseller. It's the same price as Trail Tough, I just like going to Sean. Great customer support if you need it and you will usually talk to him. Ive bought my gears and a couple other things from him as well. When doing the disc brake swap the only hard part about it is pulling the "backing plate" with the 4 bolts off of the axle shaft itself. If you have fully dissassembled and rebuilt your axle you prolly have either made this tool or know of a trick that I didnt. The friend of mine whos shop we did this at had some scrap laying around so we made the tool ourselves so that we could use the press. If you look at the instructions on Trail Toughs website, it says something like "with the correct tool", and thats what there talking about. cant vouch for how the setup works yet, but from what I hear it is much better. Ill tell ya it just down right looks good!  | |
|
| | |
PuddleJumper
Number of posts : 44
Age : 36
Location : Pasadena
Registration date : 2010-03-07
| | Subject: Re: The samurai build Wed Jul 14, 2010 12:00 pm | |
| | |
|
| | |
mdcj7
Forum Trail Guide
Number of posts : 481
Age : 70
Location : Parkville Maryland
Registration date : 2009-02-03
| | Subject: Re: The samurai build Wed Jul 14, 2010 4:53 pm | |
| looks like some fender trimming needed on the front | |
|
| | |
PuddleJumper
Number of posts : 44
Age : 36
Location : Pasadena
Registration date : 2010-03-07
| | Subject: Re: The samurai build Thu Jul 15, 2010 10:44 am | |
| - mdcj7 wrote:
- looks like some fender trimming needed on the front
HAHA yes, trimming is definitly needed. I had to turn the wheels full lock just so they wont take out my front clip. I picked up some TJ fenders last night. Going to follow the lines for the front. With a little cutting of both the fender and flare I am hoping it will turn out nice and more importantly allow me to acutally flex which ever way i would like. Also wanted to say, Not sure if there is any other Suzuki guys on here but there is an event at RC called GonZookin. Currently this event is my deadline to be trail capable. Not finished but just be able to hit the trails. We will see how that goes lol | |
|
| | |
PuddleJumper
Number of posts : 44
Age : 36
Location : Pasadena
Registration date : 2010-03-07
| | Subject: Re: The samurai build Sun Jul 18, 2010 11:47 pm | |
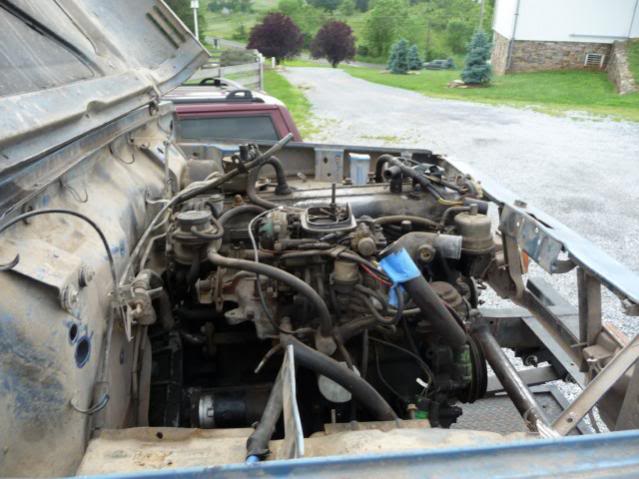
| IT RUNS! .....but doesnt drive yet. Got the dash put in gauges in and all engine wiring hooked up. alternator wiring hooked up. Hydrauliuc clutch fully installed (This was a PITA!), started some fender trimming. cut the front clip to fit the radiator.
Got the high steer kit put on order friday. sent out that day and should have it this week. still need to go get the power steering box.. decided to go normal pwr steering and not hydro.
Also ended up needing to buy a brand new radiator.. which turned out to be not straight at all. so that will be taken back and exchanged.
Also purchase a pair of 5 point suspension seats. they are cloth but they are only about 6 months old. they were in a scrambler.. guy had a fiberglass body on it and said he barely drove it. maybe a couple times a month. they are a lil faded but you cant tell brand new. they are yellow and come with seat sliders. picked them up for a whoping $100.. deal of the week?
Also just realized the transmission I have in there now is either a 4speed or I just cant go in 5th gear... im leaning torwards its a 4 speed which means I have no idea what my crawl ratio is anymore.. i think its worse then what it was with the 5 speed to be honest
now here are a couple things I did find out from running the engine and working on it this weekend....
- when the buddy of mine that put the fitting for the oil pressure gauge in the block, he cross threaded the brass fitting.. ask me how i know... so tht will need to be replaced.
- The radiator will need to have a push stle fan and not a pull style due to room constraints.
- The tach was always reading 8k.. didnt change. im hoping i hooked it up right.. it had 4 wires coming from it. green red black and i think yellow or white. ill take a look tmrw.
- I hooked up a little 3gallon boat gas tank to it to run it.. no filter but the tank i knew was clean and got the gas today but it seemed like there was more gas comming out of the return then actually running through through the engine
well... im done for tonight.. pics to come in the morning
| |
|
| | |
Sponsored content
| | Subject: Re: The samurai build | |
| |
|
| | |
| | The samurai build | |
|